Translate

Pages

Tuesday, April 17, 2018

Ōsaka and Kyoto with kids. Day 2: Universal Studios Japan

If you're reading this for Universal Studios Japan tips, your cheat sheet is coming up first. If you're reading this to vicariously experience our day through us, you can skip to the "Our Day" section.

Cheat sheet

Brief overview regarding tickets

Every ride at Universal Studios Japan has an express pass/ timed ticket line, and a regular line. The express pass is expensive, almost as much as the cost of admission. They're valid the entire day and for multiple trips on the same ride. Timed tickets are your cheaper option, but you have to seek them out, they're only valid for a certain time interval, and only once per ride. The timed ticket kiosks are in rather random locations (sometimes close to the ride, sometimes in another area entirely). Have all admission tickets for all wanna-be riders with you when you approach the kiosk. Park employees will be on hand to guide you through the options. You will have a list of time-spans to choose from. When your time comes, head to the ride and show your timed-tickets to be allowed through the short line. It will significantly cut your wait time. Popular rides often have wait times of 100 minutes, but toward the end of the day (even without an express pass or timed ticket) all but the most popular will have wait times around 45 minutes.

A word about Harry Potter 

To even enter the area, you have to wait in line as if it were a ride. You cannot enter the wizarding world at your whim, which means you can't even get to the shops or snacks or walk around inside unless you've passed through the entry point. We used a timed ticket to get in. After you get in, you'll have to wait in more lines if you want to ride any of the rides or take any of the tours. Even if you don't ride any of the rides there, it's still an incredible experience. The facades look amazing, the shops are full of interesting items, the snack carts are different from the rest of the park, and the area is full of things to see and do.
Entering the Wizarding World


Ride heights in the park 

Most commonly 122 cm and above is required. The milder rides require 92 cm and up. For the advanced rides you need to be at least 132 cm.

How scary are the rides

Some can be very scary. I don't recommend the Backdraft experience for young or sensitive children because there is a long sequence of very scary scenarios involving real fire and explosions. All of the rides in the Snoopy/ Hello Kitty area are fine, and the Wizarding World area and the Hippogriff ride are lots of fun for kids.
I was very impressed with the Backdraft experience, actually, but it was way too intense and frightening for my kids

The app

There is a Universal Studios Japan app that we did find helpful. If you can read katakana you will probably be able to navigate it just fine. (Katakana is relatively easy and can be learned with a few hours' practice, and what better motivation could you have?) When you are inside the park you can access wait times for all the rides, find your location relative to the rides you want to go on, see what time events and attractions are scheduled, find restaurants, and get height requirements for each ride.
Universal Studios Japan app for iPhone

Food

Restaurants, carts and kiosks are scattered all throughout the park. Popcorn and churros have the longest wait time. All of it is expensive. Technically you are not allowed (cough cough) to bring in your own food or drinks. Nobody checked our bags. Just sayin'.


Our Day

We wanted Universal Studios to be our first stop on our trip to get the anticipation over with for our kids. My husband and I aren't big theme-park fans because we don't like waiting so long in line for something that is over so quickly. It feels like we're spending money for the joy of waiting in line, which is stupid. Our kids are definitely on the opposite end of that spectrum, because they can divert themselves by pestering us about when we'll get to ride the rides, so they're fully entertained.
Wonderland, with Hello Kitty, Snoopy, Sesame Street, etc.

Even though we went on a Thursday, the park was packed and the lines were long (welcome to spring break in Japan). We arrived about 2 hours after the gates opened so that we could start the morning without alarm clocks and rushing. Our strategy was to take a relaxed approach to the day and hopefully hop on the popular rides just before the park closed for the day. By the end of the day the wait times did lessen by an appreciable amount, but not for all of the rides.

Wonderland

We used the Universal Studios Japan app to help us track wait times. Since the Wonderland area had the shortest waits, we headed there. Our son was embarrassed to no end when we wandered into Hello Kitty's Ribbon Collection. Some interesting fashions in there but it's mostly geared toward the most hardcore Hello Kitty fans. You get to meet Hello Kitty and have a picture taken (¥2000 for 2 pictures).

I knew we needed to get on some rides to appease the kids (it's what we came for, after all), so we spun ourselves silly on the Cupcake Dream ride.
Hello Kitty's Cupcake Dream was good fun for all of us
We rode the carousel next, and then we decided to try to find a bigger thrill. We wanted to go to the Harry Potter area, but we didn't realize that we needed to wait in line just to reach it. We decided a timed ticket would be better than waiting 80 minutes, so we tracked the ticket machines down, noted we had 2 hours to kill, and headed off for other entertainment.

Backdraft

While walking around we saw that Backdraft had a really short wait. I asked the attendant in Japanese if it was scary and she assured me it wasn't. Spoiler alert: it was. It really really was. It's not a ride, it's a show, but it's more than that. First they lull you with clips of explosions from well-known movies while you wait in line. Then you enter a room where you stand and listen to an introduction from Ron Howard (dubbed in Japanese). Our kids started to complain that they were bored, even though they could understand the Japanese better than we could. We were guided to a second room where they talked about explosions, gave us a brief safety warning, showed a clip from the movie that started to make our kids nervous, and then they lit a few things on fire. So far, not too impressive. Finally we were guided to a third room. Again a short safety reminder, and a quick minute later they started the fires. Just fake smoke and lighting effects at first, so we started to roll our eyes. Then some loud pops from fireworks and more smoke Okay, not great but not bad. Then a bigger explosion, more fireworks, more smoke, and that's when the pyrotechnics really got going. We could feel the heat from where we were standing, even though we were a good distance away. Flames billowed out in a gravity-defying river from the back room. Smoke started to rise to the ceiling. Things on the set started to collapse and crash. I knew that everything was rigged and carefully controlled, but to a kid it looks like mortal peril and chaos. I won't spoil the ending for you, but it got scarier. Our kids were wrecks afterward, and it took a while to calm them down.

Family Shows

We hoped to balance our scary experience with something funny and silly, so we went to the Monster Rock and Roll show. Everybody had a good time with that one. The costumes and set were good, and all of the performers sang and danced well. It helped our kids feel better after having the pants scared off of them.

There was just enough time for one of the outdoor Minion shows. All in Japanese, and fun.
Minions singing, dancing, and changing costumes

Harry Potter

Then it was finally time for our main event: Harry Potter! We showed our Timed Ticket and went right in. Well, sort of. There's actually quite a long path to follow before you get to the Wizarding area.
Not exactly the Deathly Hallows
Once you're in that area, it's really quite impressive. All of the park employees are dressed in wizard robes and other costumes. The shops are all akilter and look like the movie set. Even better, they're filled with some really interesting merchandise.
Perfectly crooked
Zonko's Joke Shop
If you stop in Ollivanders, you can spend ¥5000 and purchase a "working" wand for yourself. All of the wands are the same price, but they look different. You can purchase wands used by different characters, from Snape to Harry Potter to Bellatrix Lestrange, or choose wands by what material they're made from. 
LOL, not the best pic of my husband, but check out those wands!
Choose a wand that has a spell map (available in Japanese or English), which shows you spell-casting areas inside the Wizarding World. There are also instructions for how to perform each spell. At each location a park "wizard" will guide you through the steps, and different effects will greet you depending on how well you cast your spell. 


Hogwarts Castle is especially well done
Finally, we got in line for a roller coaster. Flight of the Hippogriff only had a 45 minute wait by this time, which is quite short for this ride. It had just enough thrills to please both our kids, without being too scary. We rode one more time, and then it was time to head out for the day to beat the crowds. 
Getting a good look at Hagrid's hut as we wait in line for the Flight of the Hippogriff
If you're researching for your own trip, I hope this post is helpful. I tried to learn all I could before we went, but I still had a lot of questions. If we were to do it all again, I would find all the rides that allowed a timed entry and get our times locked in. Other queries, like "which rides are too scary for my kids" could only be answered from first-hand experience, unfortunately.

Lastly, try hitting the Mos Burger (outside of the Universal Studios park) on your way out if you have kids who like toys with their meal. Their toys have a high replayability factor and will make a nice souvenir of your trip!

Sunday, April 1, 2018

Ōsaka and Kyoto with kids. Day 1: Nozomi Shinkansen

We went to Ōsaka and Kyoto for a 5-day family vacation. It was the first we've been on in years and for being out of practice I think it went rather well. Naturally there were quite a few things we didn't get to, but we wanted to enjoy things without feeling stressed about schedules and so we didn't pack our days too full.

We found an Air B&B in Ōsaka that looked good. It turned out to be a great fit for us. It was near a train station, so there was constant noise from the tracks, but not so bad that we couldn't sleep. And having easy access to the trains meant we spent less time traveling and more time enjoying! The apartment was newly built, and everything was sparkling clean. It had a nice balcony view too, but we didn't get to use that much!


Osaka at night
We purchased our Nozomi Shinkansen tickets about a week ahead of time, just to make sure we got seats together. The Nozomi trains come frequently enough that this is a step you can probably skip if it's not peak season. A little tip: you'll get two tickets for each person. One ticket is for the Shinkansen, and the other is to get you from the Shinkansen to somewhere else inside city limits. That confused us, but the ticket attendants showed us to insert both tickets to get through the Shinkansen ticket gates.


Our chariot, the Nozomi Shinkansen
We arrived near dinnertime. Meals are always a challenge. One person has texture issues and won't eat rice or fish (in Japan that's knocks out about 2/3 of the menu). Another has to avoid dairy, which is surprisingly difficult in Japan. For our first night we rather desperately barged into an izakaya, just wanting to find a place where we could sit down to a varied menu. It was expensive, but I don't know if there's anything that caters to kids better. The portions are small, the menu is varied, and you order from a tablet that has pictures all over it. (Now that I think of it, I'm wondering if it was designed by kids.) The catch is that you have to order drinks and there will be smoking. And it's expensive, as I mentioned. We splurged a little more than we normally would, and ended up with an ¥8000 bill.
Happy and full!
All in all, a good first day of our vacation! We fell asleep right away in our comfy beds!

Tuesday, March 13, 2018

Hinamatsuri in Hitachiota

I went with a group of friends to Hitachiota, Ibaraki today for the Hinamatsuri. Technically Hinamatsuri is March 3, and often called "girl's day," but the decorations for the festival are usually up for about two months, often from mid-January to late March. 
A very traditional hinamatsuri display

The decorations are intricate and numerous, and when a whole town gets in on the decorating it's quite a wonder to see. Shops string up chains of hand-made decorations that look like wisteria, or chains of little people, or little people strung together to look like wisteria. You'll see tiny rabbits, birds, carrots, balls, and lots of flowers. You find yourself dodging and weaving around dangling ornaments and nearly bumping over displays, as there is no concern shown for traffic patterns in the shops. It makes you slow down and look. How can you not, when it brushes your eyelashes?

Beautiful cloth bird ornaments displayed in front of a quilt
It's fun to see how many ways there are to interpret the hina dolls. I've seen them made of nuts, cloth, paper, q-tips, everything imaginable. This "flat-pack" version is one of my favorites (it's better without the sound, sorry):


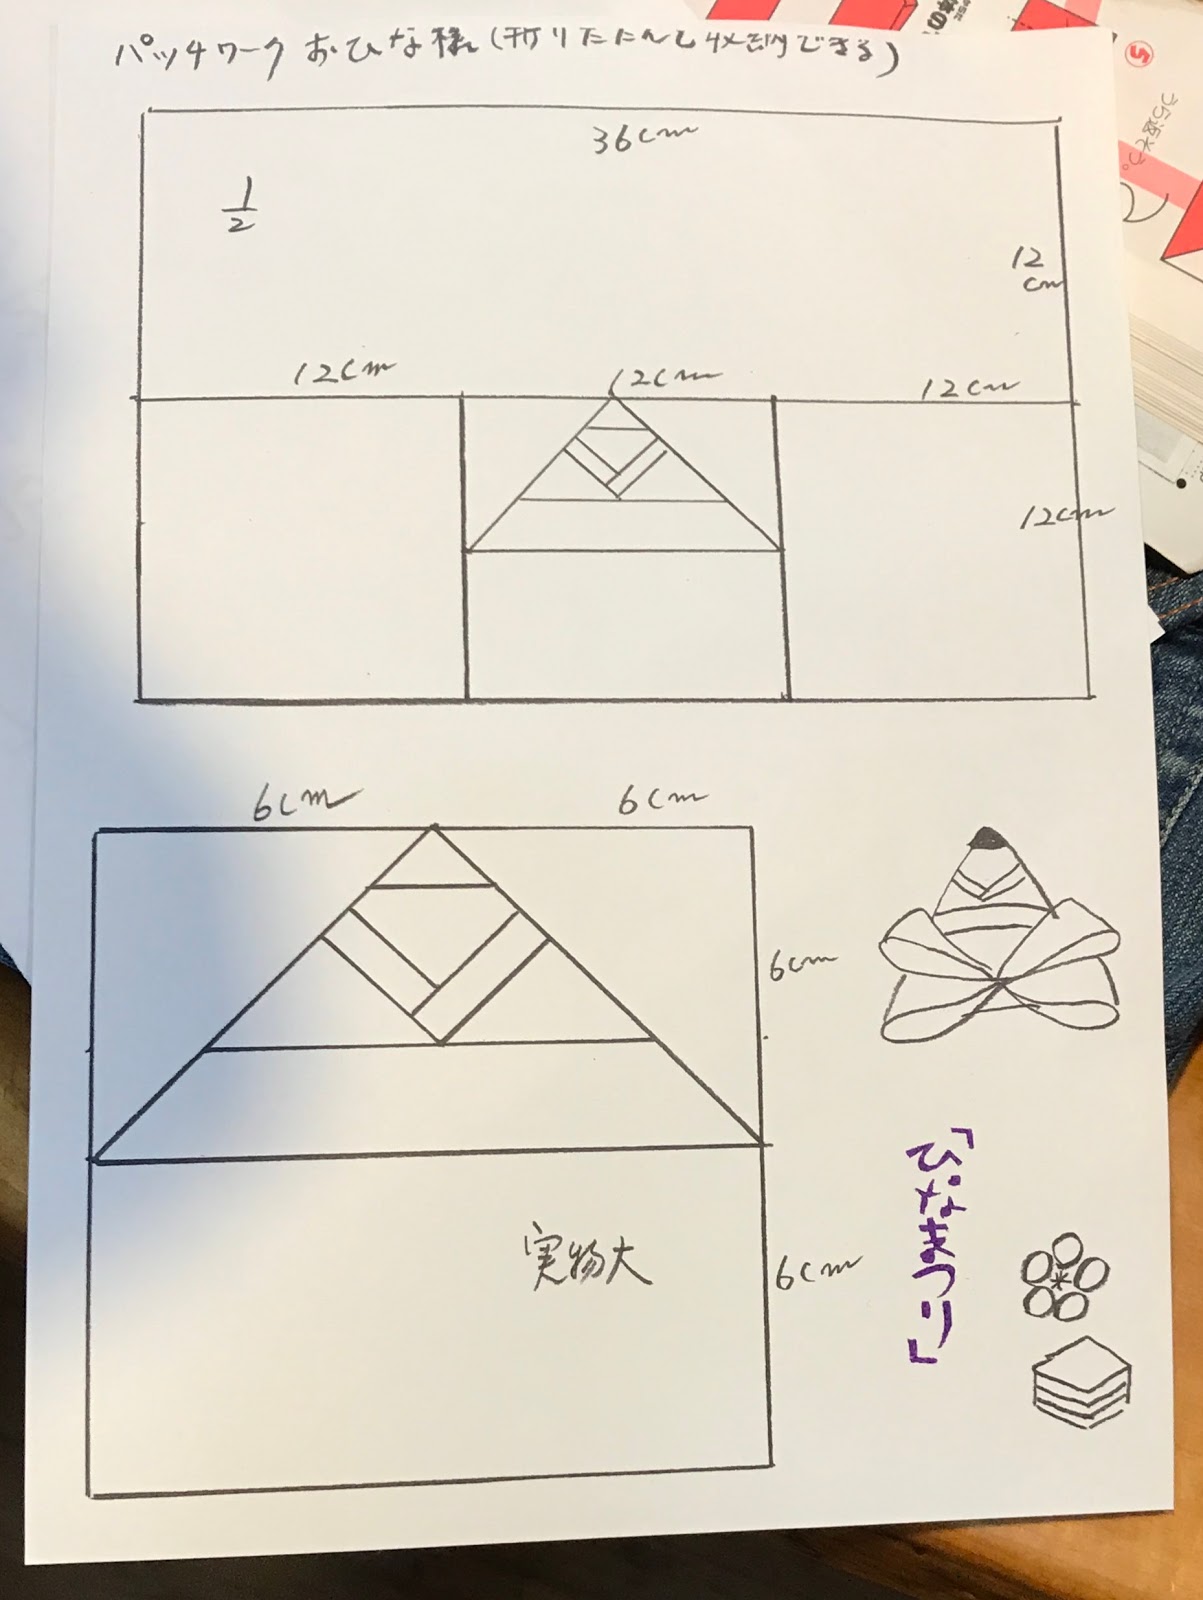
And here's the pattern for it, if you want to make your own. Use reddish colors for the female, black and neutral fabric for the male. After folding in half down the line and sewing the edges, one stitch will keep it together in the front:
Flat-pack hina doll pattern
I also saw this adorable tissue holder, made to look like a kimono:
Just part the robes to access your tissues!
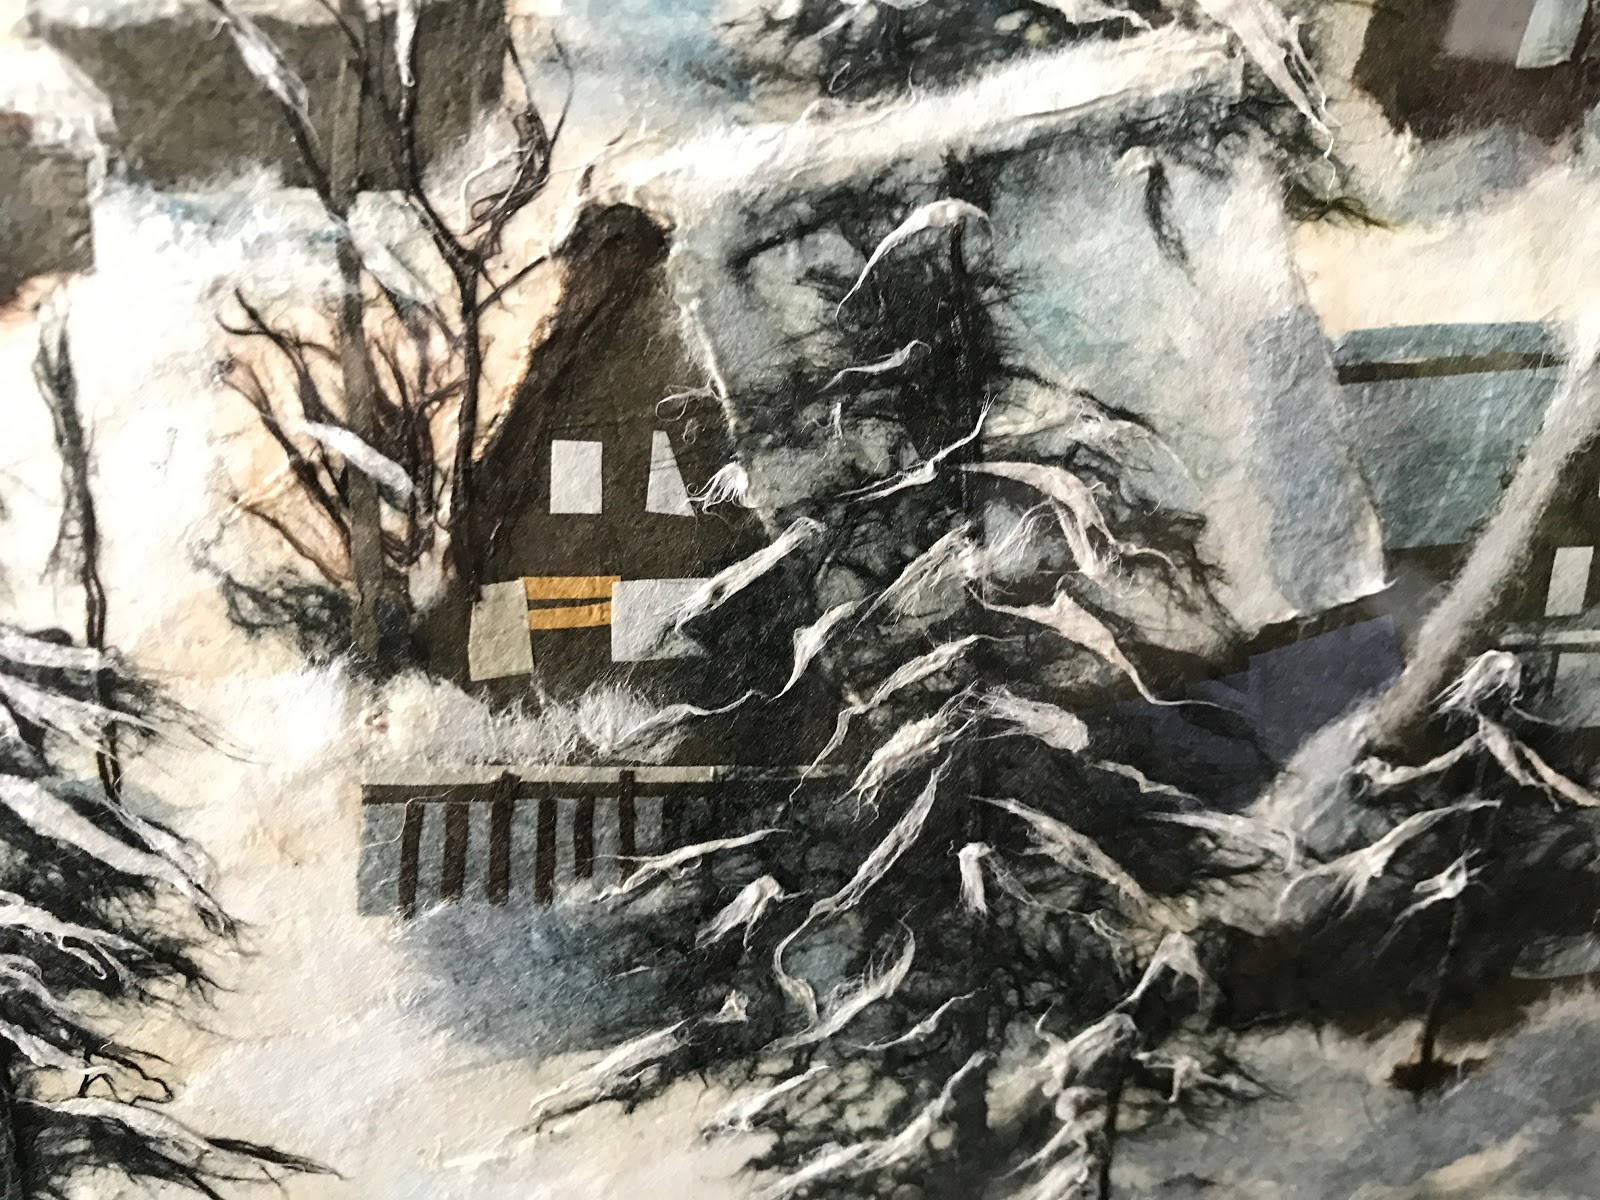
There were beautiful pictures made from torn paper that really looked like paintings:
Picture made from torn paper

Don't believe me? Here's a close-up. The windows give it away.
And I was delighted to have shopping time in an antique store. I was carrying the ikkanbari bag that I made, and one of the owners recognized the style. They had several, in fact, and a drawer full of incredibly old paper (one from the Edo era, over 100 years old). My friends were very surprised to see the collection, because even though they are Japanese they too only learned of the craft last month.
Ikkanbari made from paper with no cloth accents

Old paper from the Edo era that will be used for ikkanbari

This store sold fabric, too, and I could easily have spent an hour pouring over their selection. The prices were very reasonable for the quality and I couldn't resist buying some. There is a beautiful purple silk, an intricately woven green, and a black fabric with a very unique pattern that looks like it moves as the light changes. The black was already cut up in odd shapes, but I don't mind because it lowered the price and I'll have no trouble finding ways to use it.
Skinny bolts of beautiful cloth


This was a beautiful piece of cloth that the owners included with my purchase

So if you ever find yourself in Hitachiota in March, I highly recommend browsing in the city. It's very quiet on the weekdays and some of the shops are closed, but during the weekends they have kimono to try on and rent for the day, and the shops are busy selling beautiful and unique clothing, or delicious coffee and snacks. They told us it's fun to see everyone walking around in kimono, almost like a parade. Sounds fun, don't you think?

Friday, March 9, 2018

Ikkanbari: old-school decoupage makes a durable bag that will last for decades

I hadn't heard of ikkanbari, but when a friend asked if I would like to try this craft with her, I jumped at the opportunity. If you're in the same boat I was, here's a quick overview: it's a woven basket covered with Japanese paper and fabric, then coated in a thin layer of lacquer made from persimmon juice. The bags are light, but incredibly sturdy and can last for years. My teacher showed me a bag made about one hundred years ago, and it was in the same shape as one made yesterday. During their off season, farmers traditionally made a variety of items using this technique, including wastebaskets, flat baskets, and wooden boxes.

Here's why they're really cool: there is a lot of Japanese culture concentrated into something you can hold and use in your every-day life. The base paper can be over 100 years old and still be incredibly strong, and comes from old song books, or calligraphy practice pages, journals, or anything really. The top layer paper can be made from old books, sumo announcements, theater pages, etc. The top layer fabric often comes from old kimono or yukata that aren't worn anymore and are getting a second use, and is an introduction to Japanese color theory. On top of that, the lacquer that protects it all is from a fruit that is everywhere in Japan in the fall. When you hold an ikkanbari, you are holding history and tradition and culture. 

Here's what my finished product looks like:
Completed ikkanbari: front
Completed ikkanbari: back

Completed ikkanbari: inside
This isn't really a DIY project, because there are so many little details that you only understand when a teacher explains them. I'll describe the process, but I don't think it can substitute for an experienced teacher. Plus persimmon juice lacquer isn't something easily found on most supermarket shelves.

Total time required for beginners: about 15 hours if you work carefully, maybe 10 if you rush

What you'll need:
  • Tight, flat-woven basket (so not the twiggy type, and large bags are easier for beginners than small ones)
  • Old Japanese paper of mixed subjects (It's extremely important that you use the right paper. If it's really, really hard to tear, you've got the right stuff. Do NOT substitute other paper.)
  • Pretty washi paper for the inside of the bag (Again, substitutions are NOT recommended. Long fiber paper ONLY, or you're going to have a mess.)
  • Punch (to make the holes for the handles)
  • Pretty fabric with motifs you can cut out, ideally a handful of warm and a handful of cool colors. Apply a thin layer of glue to the back side and let dry, then cut out.
  • Scrap fabric for the rim, probably bias cut is best but straight is okay. You'll want lightweight fabric for the corners and medium weight fabric for the straight edges. Again, coat the back side with a thin layer of glue and let dry, then cut to exactly cover the rim of the basket.
  • 2 fabric strips of two different colors, 3 feet (1 m) in width, cut, sewn, and stuffed to a tube the same diameter as the holes in your bag, long enough to go around the rim of the bag 1.5 times.
  • Glue that dries clear and is non-acidic
  • 1.5-2" (4-5 cm) flat craft brush (3)
  • .5" (1.5 cm) very stiff flat craft brush
  • .5" (1.5 cm) round soft paint brush
  • Dull smoothing knife to coax the paper into behaving
  • Sharp craft knife
  • Clean, lint free wet rags
  • Kakishibu (persimmon lacquer)

First, punch the holes for the bag's handles.
My sensei, punching the holes for the bag's handles

Have old paper, glue, brushes, 2 wet rags, and one brush ready for the next step, covering the inside and the outside of the bag with paper.
Mise en place for this project
Starting with an inner long side, roughly size the paper and imagine its placement, tearing edges rather than using scissors because it gives a smoother look. Plan for the paper to overlap by about half an inch (1 cm), and overlap the rim by about the same amount.

To start, use the wide craft brush to spread a thin layer of glue inside the basket where you'll place your first sheet of paper. The glue area should be a little larger than the paper. 
Spreading the glue
Next, use the same brush to spread a thin layer of glue on the back side of the paper. 
Spreading glue on 50-year-old paper
Try to use suction from the brush to help you lift the paper and place it in the basket. 
Carefully placing the paper

When the paper is straight and mostly tight, use the brush and begin tapping from the center to the outside edge to get rid of any air pockets and make the paper smooth. You'll get glue on top of the page and that's fine. You don't want air pockets because after the paper dries it can crack over time, so be very diligent to remove them as you find them. 
Tapping the paper into place

Pat firmly with one of the rags and check for smoothness. The better it follows the contours of the basket, the more durable it will be.
Removing excess glue and smoothing the paper

First sheet, complete
Use the smoothing tool to start at the point of a wrinkle and push toward the paper's edge. Usually the wrinkle will smooth out and disappear. 
Smoothing wrinkles away with a blunt tool

Repeat these first steps until the inner sides of the basket are covered. Then start on the bottom. Again, plan for the sheets to overlap. When you get to the corners, wet a soft thin paintbrush with water and push gently but firmly until the paper is molded to the basket's shape.
A wet round paintbrush works well for the corners 

When the inside is complete, use the same technique to work the outside. Bring the paper up and over the rim, then overlap the inside layer by about half an inch (1 cm). Follow the contours of the rim as well as you possibly can. Use the hard brush to really push it up under the rim. You can even swipe the smoothing tool between the woven sides of the rim to push the paper in the gaps a little bit. This will help avoid wrinkles and make the bag very strong. Also follow the contours of the bottom of the bag very closely, using the smoothing tool to follow any edges. While working on the outside, it will be necessary to have a wet side touching the table while you work on the unfinished side. Place your second wet rag under the wet side to protect it while you finish. Let dry until hard (one hour to one day, depending on your humidity and weather).
Bag bottom, contours carefully followed
As before, but with washi paper this time, plan the inside of the bag. Follow the same steps until the inside of the bag is covered, but tap the washi in place using the second craft brush dipped in a little water instead of glue.

Washi paper is used for the second layer inside the bag
Now with more interesting paper, cover the outside of the bag with one more layer of paper. 
Outer side with second layer of paper
 Place interesting elements carefully and prominently, but not too many. Let dry until hard.
Pictures from old books add interest
Next, plan the placement of the fabric. Traditionally warm colors are placed on one side and cool colors are placed on the other. Circles of fabric are placed at the corners to improve durability. Coat the fabric's wrong side with glue first, and then the placement area on the bag. This gives the glue already on the fabric time to soften. Wet your second craft brush with a little water and tap it on the fabric's surface with the same technique as the brush with the glue on it.
Fabric placed, back side

Fabric placed, front side

Now it's time to reveal the holes that were punched at the beginning. Hold the bag up to the light so the holes are easy to see. Use a needle to poke a hole in the paper at the middle of the hole. Use a craft knife to divide the paper covering the hole into quarters. Use nippers or scissors to divide those quarters into thirds. Use the round paintbrush to coat the cut areas with water, and coat the inner side with a little glue. Push into the hole from the outside using something with a thick handle to fold the cut paper to the inside. With the smoothing tool, smooth the paper away from the hole so it lays flat on the inside of the bag.

Next, carefully cover the rim with fabric. Make sure the bottom of the fabric on the outside lines up exactly for a professional look.
Nearly done now, fabric covering the rim and holes are open
For the penultimate step, an equal amount of lacquer and water are mixed. A little goes a long way, so only use about 3 tablespoons (15 ml) of each. Use your 3rd flat craft brush to apply the lacquer, starting with the inside corners and sweeping away. Coat evenly, inside and out, including the bottom. Save the rim for last. Mop up any drips or excess with a wet rag.
Lacquer made from unripe astringent persimmons
Lastly, coat with a final layer of full-strength lacquer. Let dry completely. Add handles and a charm for good luck, and you're finished!

Our teacher told us that baskets like ours can be made in a day if done by an expert. Mine was done in 3-hour class periods spaced over a few weeks. I planned to use mine to hold my current craft projects, but I'll also carry it when I wear my yukata during the summer festivals. This was a very special project and I'm so glad I did it.

Monday, February 12, 2018

How I extended our dining table with DIY cardboard leaves

We have a nice dining table that seats 4 comfortably. I needed a practical way to expand the table to seat 8 for when company comes, but with the following limitations: it needed to be easy, sturdy, and cheap. And the only power tool I've allowed myself to buy so far is a power drill (the less we buy now, the less we have to get rid of if we decide to move overseas again). Cardboard turned out to be a perfect solution. We had quite a lot of empty boxes that I saved for a purpose like this, and a friend who owns an electronics shop was happy to give us a few larger boxes. In the end, it really was as simple as measure, glue, cut, tape, and attach.

Here are the steps I followed:


1. Measure the width of the table and the new length you want to add. I didn't do this very scientifically. I just sat down in a chair off the end of the table and approximated how much space was necessary for a new place setting, given the width of the chair.

2. Gauge and glue. 
You want the thickness of your leaf to match the thickness of the table, so start stacking your cardboard layers. Figure on some compression happening. For sturdiness, the cardboard layers need to alternate direction. Cardboard has channels running through it and is always weaker in one direction. Also, it's best if your cardboard layer is all one piece, but you can use multiple pieces like I did here. Just make sure you don't have gaps lining up on top of each other or it will be too weak. A glue gun works fine to fix the layers together. I used a cheapie glue gun from a 100 yen shop, but would have preferred a better model that would heat up enough glue for one layer. You don't need to use a lot because the tape and screws that we add later will also help hold it together.

Planning the layers for the cardboard leaf. Single whole pieces are best, but you can glue two pieces close together if you're careful about it.

3. Cut. 
I just used a utility knife to cut through the layers one by one. It wasn't exactly easy, especially when I ran across the glue. It made quite a mess too, but I expected that. I rounded the edges, figuring that sharp cardboard edges wouldn't survive long anyway.
Cardboard leaf, mid-process
4. I wasn't happy with the top. It had some bumps to it. I tried to level them out with brown paper tape. It worked well enough. The trickiest part was cutting the edge that would meet the table. Our table edge angles under, so this leaf needed to match. I imagined the slope as a triangle with a base and a height, and flipped it upside down to find the part of the cardboard that I needed to cut away. Also a very messy step. Pretty sure at one point I was even using a serrated bread knife to get it done.

Nearly completed cardboard leaf, just needs the clips


5. Time to attach. Which means buying the necessary parts and getting them home by bicycle. It definitely added a layer of complexity, but I managed. Nobody died.


My ride
 
At first I tried plastic pipe, but it drooped. Thin metal pipe (often used for shelving) worked much better. At the top of the picture below is a pipe cutter, followed by the pipe clips, O-rings of various sizes to keep the pipe from slipping out, something apparently called a t-nut, screws to go into the t-nuts, and screws to attach the clips to the table.

Necessary parts
 
Ideally, each pipe will have 4 clips; two under the leaf and two under the table. Use the t-nuts on the surface side of the cardboard leaf, with screws attaching the clips from the bottom. Annoyingly, the t-nuts were sold 5 to a package so I ended up 1 short, which is why there is one clip missing on the cardboard leaf in this view. I plan to fix that eventually.

Attached leaf from underside view
I would absolutely do this project again. The cardboard is lightweight, and since the clips remain attached, all I need to do to extend the table is slip the pipes into the clips and then slip the cardboard leaf onto the pipes. It's incredibly sturdy, but also easy to pack away. Even better, the clips don't get in the way of the normal function of the table.  
Leaf in place, top view
Leaf in place, hidden by the tablecloth


Saturday, February 3, 2018

Stained glass temari

If you like temari, this post is for you. If you don't, skip this one.

A few years ago we made temari as Christmas gifts for family and friends. My husband and I also wanted to make one for each other, but we sort of skipped that part. We had the balls wrapped and ready to go, but they sat on our counter, neglected. Last month I finally took it up again. My husband had wrapped it beautifully with purple, black and blue thread. I knew I wanted to make a pattern that would resemble stained glass, and after searching online and coming up with nothing, I found something that would work in our local library's temari books (I love living in a place where temari books are easily found in the local library).

Creating the guidelines was the first challenge. This ball is a compound 10 division, meaning the ball is first divided into 10 sections, and then after a slight rotation, is divided again, and then again...and it looks something like this midway through:

Two poles of 10 divisions each can be seen here, but more poles and divisions are needed before the guidelines are complete.

The guidelines are finished. Now it's time to create the main pattern.
After the divisions are finished, triangles join the pentagons at their sides. This pattern needs 20 triangles in 5 colors. Each triangle takes about an hour.
Two triangles weave together where they meet.

In the little video you can see how all of the divisions create a regular pattern of stars, diamonds and pentagons. Honestly the hardest part about this design was mapping out the colors so that each pentagon had all five colors, and each overlapping triangle was a different color. I had to plot it all out with colored glass pins before I covered the ball with triangles.

I got a little lost while trying to count my thread. The little pins are helping me keep track.
This pattern is a little tricky because each triangle needs to be wrapped the same number of times. If one triangle is wrapped 10 times, and another 13, the weave where they are joined won't work out right. I'm not very good at maintaining concentration during times of tedium, so there are a few triangles that I messed up and didn't want to go back and fix.

Half of the ball is complete.
You can see in the picture above that some of the edges are a little ragged where the two colors meet. I can fix that later by slipping my needle between the colors and pushing against the line.


Completed temari

I love stained glass, but I couldn't really find any examples that combined the look with temari, so I created my own. Bordering all the colors in black helps sell the effect. There are quite a few mistakes on this ball, but the black borders also help hide a multitude of sins :-)

The design inspiration for this particular ball came from this book, かわいい手まり (Kawaii Temari):
See the ball in the lower right corner?