Translate

Pages

Tuesday, March 13, 2018

Hinamatsuri in Hitachiota

I went with a group of friends to Hitachiota, Ibaraki today for the Hinamatsuri. Technically Hinamatsuri is March 3, and often called "girl's day," but the decorations for the festival are usually up for about two months, often from mid-January to late March. 
A very traditional hinamatsuri display

The decorations are intricate and numerous, and when a whole town gets in on the decorating it's quite a wonder to see. Shops string up chains of hand-made decorations that look like wisteria, or chains of little people, or little people strung together to look like wisteria. You'll see tiny rabbits, birds, carrots, balls, and lots of flowers. You find yourself dodging and weaving around dangling ornaments and nearly bumping over displays, as there is no concern shown for traffic patterns in the shops. It makes you slow down and look. How can you not, when it brushes your eyelashes?

Beautiful cloth bird ornaments displayed in front of a quilt
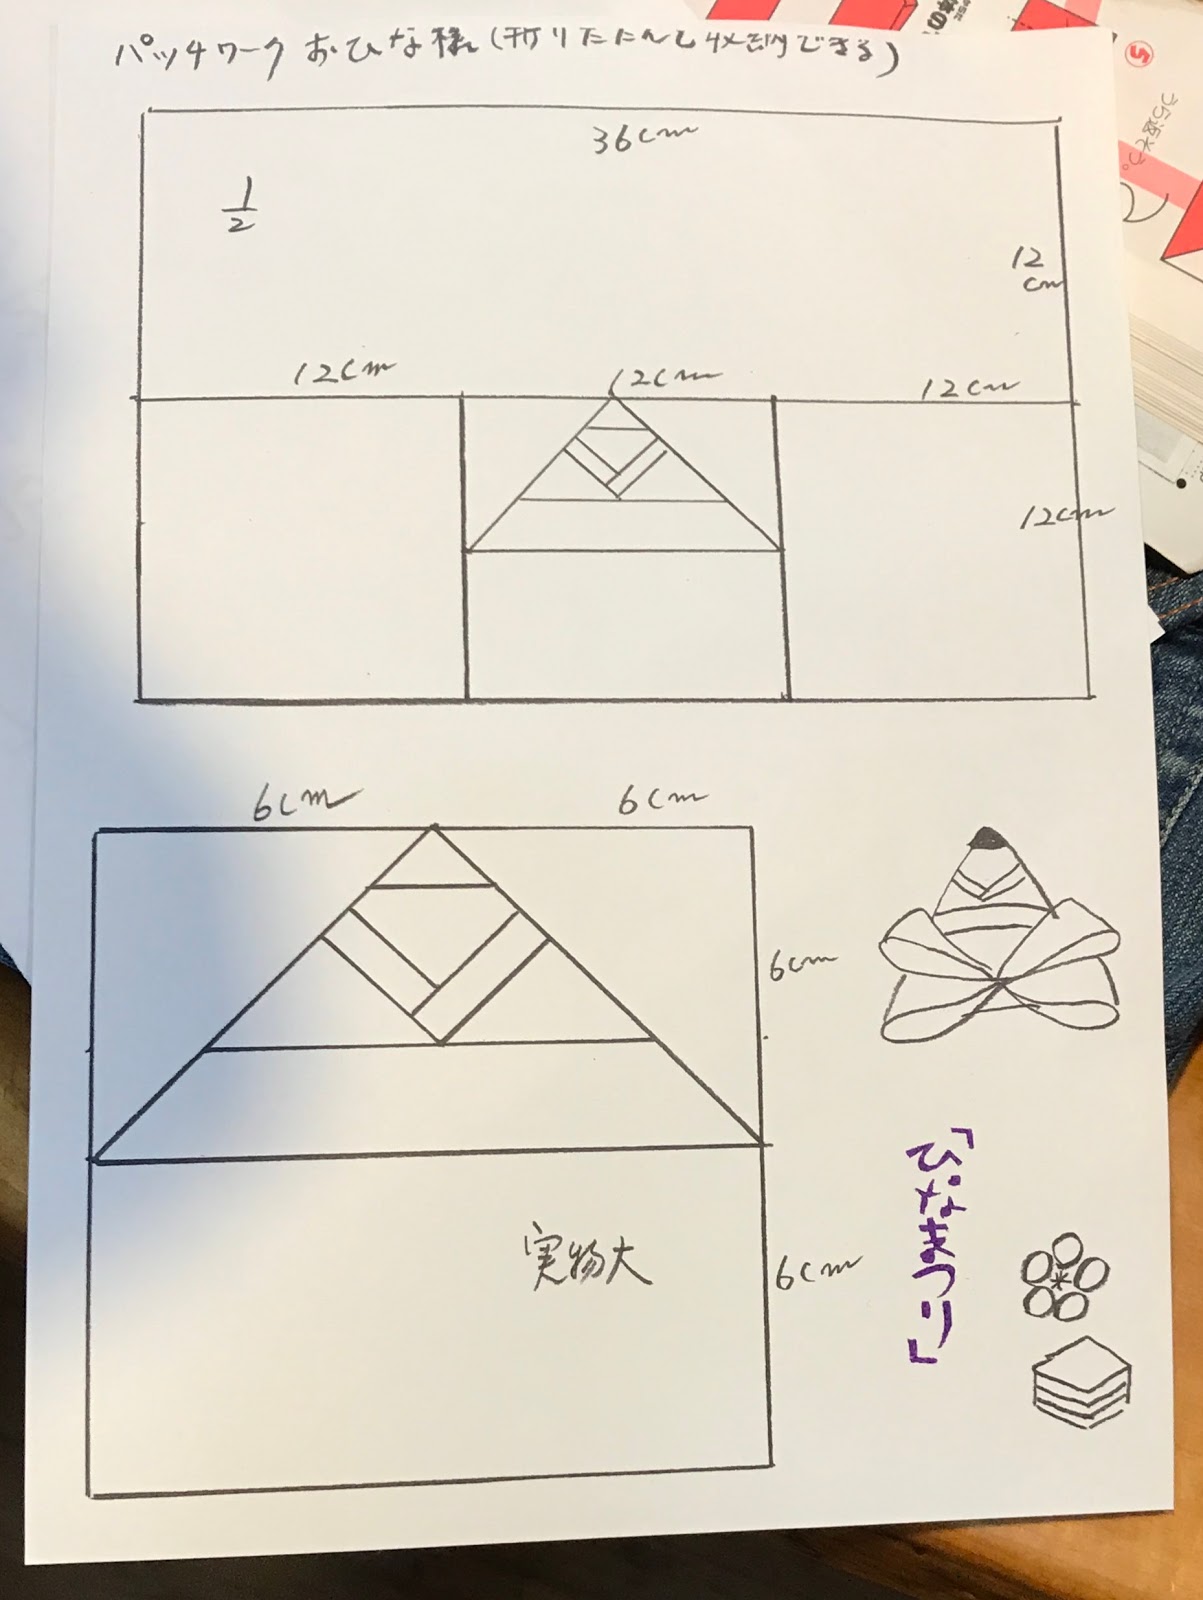
It's fun to see how many ways there are to interpret the hina dolls. I've seen them made of nuts, cloth, paper, q-tips, everything imaginable. This "flat-pack" version is one of my favorites (it's better without the sound, sorry):


And here's the pattern for it, if you want to make your own. Use reddish colors for the female, black and neutral fabric for the male. After folding in half down the line and sewing the edges, one stitch will keep it together in the front:
Flat-pack hina doll pattern
I also saw this adorable tissue holder, made to look like a kimono:
Just part the robes to access your tissues!
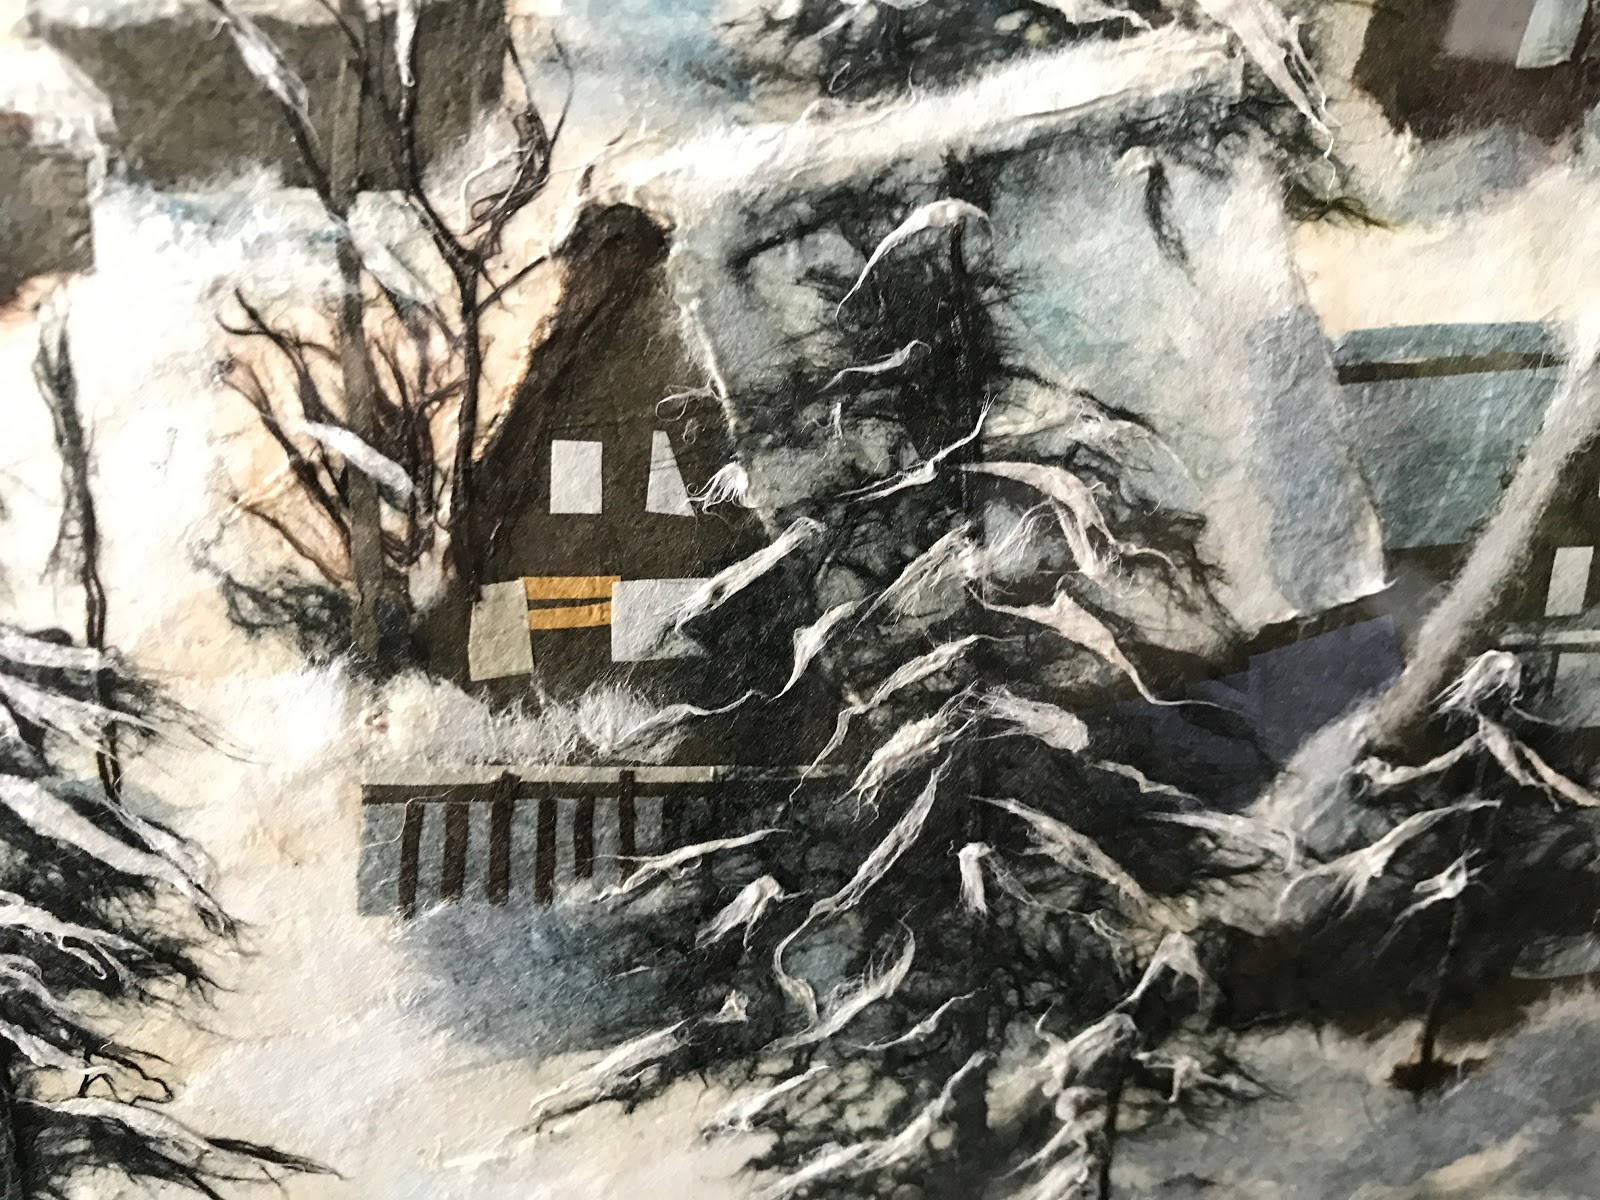
There were beautiful pictures made from torn paper that really looked like paintings:
Picture made from torn paper

Don't believe me? Here's a close-up. The windows give it away.
And I was delighted to have shopping time in an antique store. I was carrying the ikkanbari bag that I made, and one of the owners recognized the style. They had several, in fact, and a drawer full of incredibly old paper (one from the Edo era, over 100 years old). My friends were very surprised to see the collection, because even though they are Japanese they too only learned of the craft last month.
Ikkanbari made from paper with no cloth accents

Old paper from the Edo era that will be used for ikkanbari

This store sold fabric, too, and I could easily have spent an hour pouring over their selection. The prices were very reasonable for the quality and I couldn't resist buying some. There is a beautiful purple silk, an intricately woven green, and a black fabric with a very unique pattern that looks like it moves as the light changes. The black was already cut up in odd shapes, but I don't mind because it lowered the price and I'll have no trouble finding ways to use it.
Skinny bolts of beautiful cloth


This was a beautiful piece of cloth that the owners included with my purchase

So if you ever find yourself in Hitachiota in March, I highly recommend browsing in the city. It's very quiet on the weekdays and some of the shops are closed, but during the weekends they have kimono to try on and rent for the day, and the shops are busy selling beautiful and unique clothing, or delicious coffee and snacks. They told us it's fun to see everyone walking around in kimono, almost like a parade. Sounds fun, don't you think?

Friday, March 9, 2018

Ikkanbari: old-school decoupage makes a durable bag that will last for decades

I hadn't heard of ikkanbari, but when a friend asked if I would like to try this craft with her, I jumped at the opportunity. If you're in the same boat I was, here's a quick overview: it's a woven basket covered with Japanese paper and fabric, then coated in a thin layer of lacquer made from persimmon juice. The bags are light, but incredibly sturdy and can last for years. My teacher showed me a bag made about one hundred years ago, and it was in the same shape as one made yesterday. During their off season, farmers traditionally made a variety of items using this technique, including wastebaskets, flat baskets, and wooden boxes.

Here's why they're really cool: there is a lot of Japanese culture concentrated into something you can hold and use in your every-day life. The base paper can be over 100 years old and still be incredibly strong, and comes from old song books, or calligraphy practice pages, journals, or anything really. The top layer paper can be made from old books, sumo announcements, theater pages, etc. The top layer fabric often comes from old kimono or yukata that aren't worn anymore and are getting a second use, and is an introduction to Japanese color theory. On top of that, the lacquer that protects it all is from a fruit that is everywhere in Japan in the fall. When you hold an ikkanbari, you are holding history and tradition and culture. 

Here's what my finished product looks like:
Completed ikkanbari: front
Completed ikkanbari: back

Completed ikkanbari: inside
This isn't really a DIY project, because there are so many little details that you only understand when a teacher explains them. I'll describe the process, but I don't think it can substitute for an experienced teacher. Plus persimmon juice lacquer isn't something easily found on most supermarket shelves.

Total time required for beginners: about 15 hours if you work carefully, maybe 10 if you rush

What you'll need:
  • Tight, flat-woven basket (so not the twiggy type, and large bags are easier for beginners than small ones)
  • Old Japanese paper of mixed subjects (It's extremely important that you use the right paper. If it's really, really hard to tear, you've got the right stuff. Do NOT substitute other paper.)
  • Pretty washi paper for the inside of the bag (Again, substitutions are NOT recommended. Long fiber paper ONLY, or you're going to have a mess.)
  • Punch (to make the holes for the handles)
  • Pretty fabric with motifs you can cut out, ideally a handful of warm and a handful of cool colors. Apply a thin layer of glue to the back side and let dry, then cut out.
  • Scrap fabric for the rim, probably bias cut is best but straight is okay. You'll want lightweight fabric for the corners and medium weight fabric for the straight edges. Again, coat the back side with a thin layer of glue and let dry, then cut to exactly cover the rim of the basket.
  • 2 fabric strips of two different colors, 3 feet (1 m) in width, cut, sewn, and stuffed to a tube the same diameter as the holes in your bag, long enough to go around the rim of the bag 1.5 times.
  • Glue that dries clear and is non-acidic
  • 1.5-2" (4-5 cm) flat craft brush (3)
  • .5" (1.5 cm) very stiff flat craft brush
  • .5" (1.5 cm) round soft paint brush
  • Dull smoothing knife to coax the paper into behaving
  • Sharp craft knife
  • Clean, lint free wet rags
  • Kakishibu (persimmon lacquer)

First, punch the holes for the bag's handles.
My sensei, punching the holes for the bag's handles

Have old paper, glue, brushes, 2 wet rags, and one brush ready for the next step, covering the inside and the outside of the bag with paper.
Mise en place for this project
Starting with an inner long side, roughly size the paper and imagine its placement, tearing edges rather than using scissors because it gives a smoother look. Plan for the paper to overlap by about half an inch (1 cm), and overlap the rim by about the same amount.

To start, use the wide craft brush to spread a thin layer of glue inside the basket where you'll place your first sheet of paper. The glue area should be a little larger than the paper. 
Spreading the glue
Next, use the same brush to spread a thin layer of glue on the back side of the paper. 
Spreading glue on 50-year-old paper
Try to use suction from the brush to help you lift the paper and place it in the basket. 
Carefully placing the paper

When the paper is straight and mostly tight, use the brush and begin tapping from the center to the outside edge to get rid of any air pockets and make the paper smooth. You'll get glue on top of the page and that's fine. You don't want air pockets because after the paper dries it can crack over time, so be very diligent to remove them as you find them. 
Tapping the paper into place

Pat firmly with one of the rags and check for smoothness. The better it follows the contours of the basket, the more durable it will be.
Removing excess glue and smoothing the paper

First sheet, complete
Use the smoothing tool to start at the point of a wrinkle and push toward the paper's edge. Usually the wrinkle will smooth out and disappear. 
Smoothing wrinkles away with a blunt tool

Repeat these first steps until the inner sides of the basket are covered. Then start on the bottom. Again, plan for the sheets to overlap. When you get to the corners, wet a soft thin paintbrush with water and push gently but firmly until the paper is molded to the basket's shape.
A wet round paintbrush works well for the corners 

When the inside is complete, use the same technique to work the outside. Bring the paper up and over the rim, then overlap the inside layer by about half an inch (1 cm). Follow the contours of the rim as well as you possibly can. Use the hard brush to really push it up under the rim. You can even swipe the smoothing tool between the woven sides of the rim to push the paper in the gaps a little bit. This will help avoid wrinkles and make the bag very strong. Also follow the contours of the bottom of the bag very closely, using the smoothing tool to follow any edges. While working on the outside, it will be necessary to have a wet side touching the table while you work on the unfinished side. Place your second wet rag under the wet side to protect it while you finish. Let dry until hard (one hour to one day, depending on your humidity and weather).
Bag bottom, contours carefully followed
As before, but with washi paper this time, plan the inside of the bag. Follow the same steps until the inside of the bag is covered, but tap the washi in place using the second craft brush dipped in a little water instead of glue.

Washi paper is used for the second layer inside the bag
Now with more interesting paper, cover the outside of the bag with one more layer of paper. 
Outer side with second layer of paper
 Place interesting elements carefully and prominently, but not too many. Let dry until hard.
Pictures from old books add interest
Next, plan the placement of the fabric. Traditionally warm colors are placed on one side and cool colors are placed on the other. Circles of fabric are placed at the corners to improve durability. Coat the fabric's wrong side with glue first, and then the placement area on the bag. This gives the glue already on the fabric time to soften. Wet your second craft brush with a little water and tap it on the fabric's surface with the same technique as the brush with the glue on it.
Fabric placed, back side

Fabric placed, front side

Now it's time to reveal the holes that were punched at the beginning. Hold the bag up to the light so the holes are easy to see. Use a needle to poke a hole in the paper at the middle of the hole. Use a craft knife to divide the paper covering the hole into quarters. Use nippers or scissors to divide those quarters into thirds. Use the round paintbrush to coat the cut areas with water, and coat the inner side with a little glue. Push into the hole from the outside using something with a thick handle to fold the cut paper to the inside. With the smoothing tool, smooth the paper away from the hole so it lays flat on the inside of the bag.

Next, carefully cover the rim with fabric. Make sure the bottom of the fabric on the outside lines up exactly for a professional look.
Nearly done now, fabric covering the rim and holes are open
For the penultimate step, an equal amount of lacquer and water are mixed. A little goes a long way, so only use about 3 tablespoons (15 ml) of each. Use your 3rd flat craft brush to apply the lacquer, starting with the inside corners and sweeping away. Coat evenly, inside and out, including the bottom. Save the rim for last. Mop up any drips or excess with a wet rag.
Lacquer made from unripe astringent persimmons
Lastly, coat with a final layer of full-strength lacquer. Let dry completely. Add handles and a charm for good luck, and you're finished!

Our teacher told us that baskets like ours can be made in a day if done by an expert. Mine was done in 3-hour class periods spaced over a few weeks. I planned to use mine to hold my current craft projects, but I'll also carry it when I wear my yukata during the summer festivals. This was a very special project and I'm so glad I did it.

Monday, February 12, 2018

How I extended our dining table with DIY cardboard leaves

We have a nice dining table that seats 4 comfortably. I needed a practical way to expand the table to seat 8 for when company comes, but with the following limitations: it needed to be easy, sturdy, and cheap. And the only power tool I've allowed myself to buy so far is a power drill (the less we buy now, the less we have to get rid of if we decide to move overseas again). Cardboard turned out to be a perfect solution. We had quite a lot of empty boxes that I saved for a purpose like this, and a friend who owns an electronics shop was happy to give us a few larger boxes. In the end, it really was as simple as measure, glue, cut, tape, and attach.

Here are the steps I followed:


1. Measure the width of the table and the new length you want to add. I didn't do this very scientifically. I just sat down in a chair off the end of the table and approximated how much space was necessary for a new place setting, given the width of the chair.

2. Gauge and glue. 
You want the thickness of your leaf to match the thickness of the table, so start stacking your cardboard layers. Figure on some compression happening. For sturdiness, the cardboard layers need to alternate direction. Cardboard has channels running through it and is always weaker in one direction. Also, it's best if your cardboard layer is all one piece, but you can use multiple pieces like I did here. Just make sure you don't have gaps lining up on top of each other or it will be too weak. A glue gun works fine to fix the layers together. I used a cheapie glue gun from a 100 yen shop, but would have preferred a better model that would heat up enough glue for one layer. You don't need to use a lot because the tape and screws that we add later will also help hold it together.

Planning the layers for the cardboard leaf. Single whole pieces are best, but you can glue two pieces close together if you're careful about it.

3. Cut. 
I just used a utility knife to cut through the layers one by one. It wasn't exactly easy, especially when I ran across the glue. It made quite a mess too, but I expected that. I rounded the edges, figuring that sharp cardboard edges wouldn't survive long anyway.
Cardboard leaf, mid-process
4. I wasn't happy with the top. It had some bumps to it. I tried to level them out with brown paper tape. It worked well enough. The trickiest part was cutting the edge that would meet the table. Our table edge angles under, so this leaf needed to match. I imagined the slope as a triangle with a base and a height, and flipped it upside down to find the part of the cardboard that I needed to cut away. Also a very messy step. Pretty sure at one point I was even using a serrated bread knife to get it done.

Nearly completed cardboard leaf, just needs the clips


5. Time to attach. Which means buying the necessary parts and getting them home by bicycle. It definitely added a layer of complexity, but I managed. Nobody died.


My ride
 
At first I tried plastic pipe, but it drooped. Thin metal pipe (often used for shelving) worked much better. At the top of the picture below is a pipe cutter, followed by the pipe clips, O-rings of various sizes to keep the pipe from slipping out, something apparently called a t-nut, screws to go into the t-nuts, and screws to attach the clips to the table.

Necessary parts
 
Ideally, each pipe will have 4 clips; two under the leaf and two under the table. Use the t-nuts on the surface side of the cardboard leaf, with screws attaching the clips from the bottom. Annoyingly, the t-nuts were sold 5 to a package so I ended up 1 short, which is why there is one clip missing on the cardboard leaf in this view. I plan to fix that eventually.

Attached leaf from underside view
I would absolutely do this project again. The cardboard is lightweight, and since the clips remain attached, all I need to do to extend the table is slip the pipes into the clips and then slip the cardboard leaf onto the pipes. It's incredibly sturdy, but also easy to pack away. Even better, the clips don't get in the way of the normal function of the table.  
Leaf in place, top view
Leaf in place, hidden by the tablecloth


Saturday, February 3, 2018

Stained glass temari

If you like temari, this post is for you. If you don't, skip this one.

A few years ago we made temari as Christmas gifts for family and friends. My husband and I also wanted to make one for each other, but we sort of skipped that part. We had the balls wrapped and ready to go, but they sat on our counter, neglected. Last month I finally took it up again. My husband had wrapped it beautifully with purple, black and blue thread. I knew I wanted to make a pattern that would resemble stained glass, and after searching online and coming up with nothing, I found something that would work in our local library's temari books (I love living in a place where temari books are easily found in the local library).

Creating the guidelines was the first challenge. This ball is a compound 10 division, meaning the ball is first divided into 10 sections, and then after a slight rotation, is divided again, and then again...and it looks something like this midway through:

Two poles of 10 divisions each can be seen here, but more poles and divisions are needed before the guidelines are complete.

The guidelines are finished. Now it's time to create the main pattern.
After the divisions are finished, triangles join the pentagons at their sides. This pattern needs 20 triangles in 5 colors. Each triangle takes about an hour.
Two triangles weave together where they meet.

In the little video you can see how all of the divisions create a regular pattern of stars, diamonds and pentagons. Honestly the hardest part about this design was mapping out the colors so that each pentagon had all five colors, and each overlapping triangle was a different color. I had to plot it all out with colored glass pins before I covered the ball with triangles.

I got a little lost while trying to count my thread. The little pins are helping me keep track.
This pattern is a little tricky because each triangle needs to be wrapped the same number of times. If one triangle is wrapped 10 times, and another 13, the weave where they are joined won't work out right. I'm not very good at maintaining concentration during times of tedium, so there are a few triangles that I messed up and didn't want to go back and fix.

Half of the ball is complete.
You can see in the picture above that some of the edges are a little ragged where the two colors meet. I can fix that later by slipping my needle between the colors and pushing against the line.


Completed temari

I love stained glass, but I couldn't really find any examples that combined the look with temari, so I created my own. Bordering all the colors in black helps sell the effect. There are quite a few mistakes on this ball, but the black borders also help hide a multitude of sins :-)

The design inspiration for this particular ball came from this book, かわいい手まり (Kawaii Temari):
See the ball in the lower right corner?


Starting elementary school in Japan

The school year begins in April in Japan, but if you have a kid who will be a first grader, preparation begins in November with a required basic health-check for all entering students where their height, weight, vision, hearing and development are assessed. 

February is orientation time for parents and guardians. They gather at the local school gymnasium on a given day and time, and listen to the expectations for the guardians and the children. Forms are turned in for automatic payment withdrawal for the monthly school fees, a schedule is created among the guardians to ensure that the new students will be walked safely home for the first few weeks by someone they trust, and the parents pay for and hike home laden with bags and bags of school supplies.


Bags and bags of school supplies. Parking is sparse at schools, so most parents walk or bike all of this home.

School supplies, exploded view. Total cost was about $350.
Clockwise from upper left: 
  • green box to hold art supplies
  • gym clothes
  • light blue placemat used during lunch
  • indoor shoes (toe color is set by the school, dark green for our kids)
  • disaster hood to be pulled out and used in case of an earthquake or other disaster (also doubles as a seat cushion)
  • blank workbooks with a box of nendo on top (ubiquitous Japanese clay, different than play-dough)
  • reversible red-white hat for gym, used regularly because they play so many red vs. white competitive games
  • scissors
  • pianica (piano that makes noise when you blow into it)
  • packets and packets of information
  • art supplies
  • castanets
  • and a very useful clipboard for school outings:

Clipboard used during field trips.


I really like how practical this is. Easy to carry, stores what you need, and gives you a hard writing surface anywhere.
The packets of paper outline a few things: 
  • bags the student will need and the appropriate sizes for them 
    • indoor shoes
    • lunch bag 
    • toothbrush and cup bag
    • gym clothes bag
    • and a carryall bag for everything else
  • what self-care the student should be able to do before entering school 
    • go to the bathroom by themselves
    • eat the provided school lunch in 20 minutes or less
    • read and write their name in hiragana
    • wring out a cleaning rag
  • general health and wellness guidelines such as getting enough sleep and eating a good breakfast before school.

The next step will be for us to fill out the health card and emergency contact info that will go in our child's file in school. We should have it done before the next meeting in April, where we will be given more school supplies including books and the all-important yellow hat.

The theme-less blog

Hey, it's been a while. I thought I needed to pick a theme for my blog and stick with it, but it would mean leaving out a lot of interesting stuff. So, no theme. Just me and whatever I find interesting. So some days I'll show you the latest craft I've gotten myself into. Other days it will be DIY home stuff. You'll have your random sprinkling of cool places we go, things we see, and things the kids are getting up to. It will be a total hodgepodge. You'll love it. Or you'll at least skip the ones you don't.

And now that that's over with, I'll get on with the real posting.