
 |
| Completed dress form at lowest height |
Why a dress form?
I've got reeeaaaally broad shoulders. As in, men's medium or large shirts fit me pretty well in that area. So finding stuff in Japan that fits me well is a challenge. Much easier to make my own clothes, and it's easier to make or alter my own clothes if I have a dress form to drape on. I actually have a personalized soft foam form back in the States, but the shipping cost was prohibitive. So, DIY to the rescue.Why not just make a duct tape form?
Duct tape isn't pinnable. It gets your pins all sticky. Paper tape works and doesn't get pins sticky, but I have a hard time sourcing it here and it requires wetting the paper and then waiting for it to dry while it's on your body. Both types are also difficult to put on a stand, and are easily malformed. Originally I thought I would make a tape form and fill it with foam and call it good, but I realized I really don't like the surface of the tape form (duct tape and paper tape have trouble staying smooth and they're prone to buckling). I decided that using the tape shell as a mold for the foam was the best option for solving all all of the issues in one go. Even though it's early days yet, it looks like it worked even better than I expected.Time required
Probably 5 solid days, depending on how you work. I'm just assuming that you have to feed yourself and run errands and other essential things like that. The foam probably took 4 hours, with walk-away time during the curing process. I had to sand quite a bit of foam away afterward, which took about 2 hours. The cutting, fitting, trimming, and sewing by hand and machine took about 8 hours. Area prep and cleanup also take time. That doesn't add up to 5 days, but everything always takes longer than I think it will, so I figured I'd overestimate for once.Total cost
Less than ¥10,000Materials (top to bottom, plus a few extra I missed in the picture)
 |
| DIY dress form materials |
- Taped dress shell (old shirt, lots of duct tape, plastic wrap, friend to help)
- Cardboard
- Pillow
- Old hanger (rigid, not flexible)
- PVC pipe 2 meters long
- Duct tape
- Pipe that fits inside the PVC pipe, at least 1 meter long (2 is probably best)
- Metal file
- Sponge block (I didn't need this in the end)
- Coping saw
- Plastic ring that can be tightened, same diameter as the inside pipe
- Long-sleeved gloves
- Mask
- Base
- Socket and screws to attach the pipe to the base
- Expanding spray foam
- Power drill
- Utility knife (also for cutting the foam)
- Cardboard tube (from gift wrap, paper towel rolls, etc.)
- Spray bottle filled with water
- Kitchen plastic wrap
- 3 meters of heavy fabric to cover the dress form
- Curved needles for hand sewing
- Strong thread
- Bra that fits well, if you usually wear one
- Cotton batting for quilts
- Glue gun and glue sticks
Process (in brief)
So here's the gist. Fill a dress form shell with spray foam. After the foam cures, cut away the shell and use it to make the pattern for your dress form's cover. Pad or trim the cured foam to match your measurements, cover the foam lightly with quilter's batting, and put the cover on your dress form.
Process (detailed text, not enough pictures)
- Make a taped dress form that includes the neck and sleeves. If you haven't done this before, get a few how-to videos under your belt before you try it. For this case a duct tape form will be fine. I tried using brown craft paper because it was less than ¥100 per roll. The problem with it was that it didn't stick to itself well, and it didn't form well to curves. If I did it over again, I would use duct tape.
- Cut the form off of the body, straight up the back. You already know to be careful here.
- Create the inner skeleton. Take the wide diameter pipe and use the coping saw and the metal file to notch out a place for the hanger. Slip the hanger in and tape it in place with duct tape.
Slip the cardboard tubes over the hanger arms and tape them in place. This will help the dress form keep a rounded shape at the shoulders.
Tube with notched-out area for hanger 
Hanger taped to wide-diameter pipe, with cardboard tubes covering the arms - Make the form's base. Attach the socket to the base using the drill and screws. Fit the smaller-diameter pipe into the socket. Add the screw collar to the pipe, somewhere near the bottom. You'll use this later to adjust your dress form's height.
- Prep your shell. Line the inside of your taped dress shell with two separate layers of plastic wrap. This will help the shell release from the finished foam. You'll reuse the shell to make a pattern for the dress form cover. Use plastic wrap to cover the neck hole. Cap the sleeve ends of the shell with cardboard and tape in place.
- Pad out your skeleton. Take the pillow and poke the pipe-hanger through it from the pillow's seam edge to the opposite edge. The pillow is key because it gives the foam room to expand, without bursting your dress shell. Place the pipe-hanger-pillow into the taped dress shell, fitting the hanger into the dress shell's shoulders. Center the hook in the shell's neck as best you can. You won't tape the dress shell's center back closed yet.
- Fill upper front torso with spray foam. Stuff starts happening quickly here. Have a spray bottle filled with water handy. The spray foam requires water to activate and cure, so you'll be using it frequently. Protect all surfaces where the foam might land. Do this project in a well-ventilated area.
IMPORTANT: Do NOT touch wet foam because it sticks, then it makes long sticky strings, and then it sticks like superglue to whatever else it comes in contact with. Superglue cheese. Horribly messy stuff while it's wet. Instead, if it ended up somewhere you didn't want it, wait for it to dry, and then sand it off.
Lay your shell down on its chest. Liberally spray the inner surface of the shell with water. Wearing your long gloves, mask, protective eye wear, and clothes you don't care about, follow the directions on the spray-foam container (shaking and all that good prep stuff). Squirt a couple test streams into the arms of one sleeve of the shell, just to get an idea of how much the foam will expand. Once you get comfortable with it, lift up the bottom end of the hanger-pipe and spray inside the sleeves and chest front, and down the torso. Lay the pipe down and spray into areas that will be hard to reach when the shell is taped closed (neck area, shoulders, upper torso). You might use an entire can here. Don't do the area below the torso yet. Spray the foam with water immediately. Tape the dress shell closed. Let the foam harden. - Spray foam the lower body. You'll probably be starting a new can of foam here. Same precautions as before. Prep with water. Spray foam into the bottom of the dress shell, trying hard to get it into all the nooks and crannies. Spray with water. You'll actually have to hold the form upside-down while you wait for it to cure enough that it's safe to lay it down or lean it against something. Allow to cure again.
- Check for unfilled areas. Once it is completely dry and cured, gently use your hands to press all over the dress form from the outside, searching for pockets that the foam didn't get to. If it's a hard-to-reach area, you have the option of poking a hole in the dress shell and applying foam that way. Just make sure you've sprayed the foam everywhere it needs to go. Spray with water. Again, allow to cure.

Spray foam steps are finished! Also, I caught a big one! - Remove tape shell from foam body. Once the foam is completely dry and cured, try to remove the tape shell from the foam form in one piece. Save the shell. Now it's time to make measurements. Measure at your waist, hips, and chest, then compare to the foam's measurements. If it's too big, use sandpaper, a utility knife, or the coping saw to reduce it (again, mask, safety glasses, well-ventilated area, etc.). If it's only a little too small, that's fine since we'll be using cotton batting to pad the form a little.
- Make the cover for the dress form. Take your taped shell from before and mark princess seams on the front and back of one side. Mark the side seams, keeping them perpendicular to the floor. Mark the shoulder seams. Mark the neck seams. Mark the armscye (where the arm meets the body, the sleeve seam). I also marked triangles on the seams to help me match points.
IMPORTANT: You need to decide if you want to have a back center seam, or if you want to sew the sheath closed at the side seam. Having a back center seam makes it easier to do a fit-check, but it is a much longer seam to sew by hand than the side seam. - Cut the shell into pattern pieces. Cut the marked seams. For symmetry, flip the cut side onto the uncut side (front and back, but not at the same time) and draw princess seams again. (If your body halves are not equal, draw the princess seams by hand instead of using the cut side as the pattern.) Mark and label all pieces, and cut out.
- Cut out your fabric. If your tape shell held together pretty well, you can use it as your pattern pieces. Lay them on your fabric, add seam allowance (be generous, in case you want to expand your form later), mark an label all pieces and cut out. If your shell suffered a lot, use it to make a test sheath first using inexpensive fabric like gingham. Adjust as necessary and make a new pattern, then continue on the form's fabric.

Tape shell as pattern on gingham test fabric - Apply a thin layer of batting to the form. Spray foam tends to shed. Minimize it with a layer of cotton batting between your foam and your cover. The batting should separate easily into very fine layers, so you have a lot of control over how thick or thin it is.

Cotton batting, separated into thin layers 
Foam form with cotton batting applied - If applicable, add a bra. Put the bra on your dress form, if you normally wear one. I forgot this step and really wish I hadn't. By the time I remembered, I'd sewn the cover on completely and I didn't want to undo it all.
- Sew the cover. If you have a center back seam, sew all pieces together and leave that seam open. Ease it onto your form and check the fit. Adjust as necessary.
If you do not have a center back seam, sew all pieces except one side seam. Ease onto your dress form and check the fit. Adjust as necessary. - Zipper or no zipper? Time to make a choice. You can either use a zipper to close your cover, or you can use a ladder stitch and finish it all by hand. A zipper is much faster for making adjustments, but it might get in the way during drapings and fittings. Sewing by hand can be awkward and time-consuming, but the result looks very professional and you have a lot of control over the fabric while you sew. Choose the one that works best for your situation and put the cover on your form.

I chose to close my cover by hand at the side seam - Make hole covers. The only thing left is to cover the visible holes for the arms, neck, and lower body. Use the form as a guide and trace the shape of the openings onto cardboard. With the same fabric you used for the form, cover the cardboard. Wrap the fabric up over the edges and glue to the wrong side of the cardboard with a glue gun.
- Cap the holes. Use a ladder stitch and strong thread to sew the cardboard covers onto the dress form cover. That's it! You're done!! You may want to cut the large-diameter pipe so that it ends close to your dress form. It will look better. Until I buy a longer base-pipe, I'm going to leave mine so it's not too wobbly.


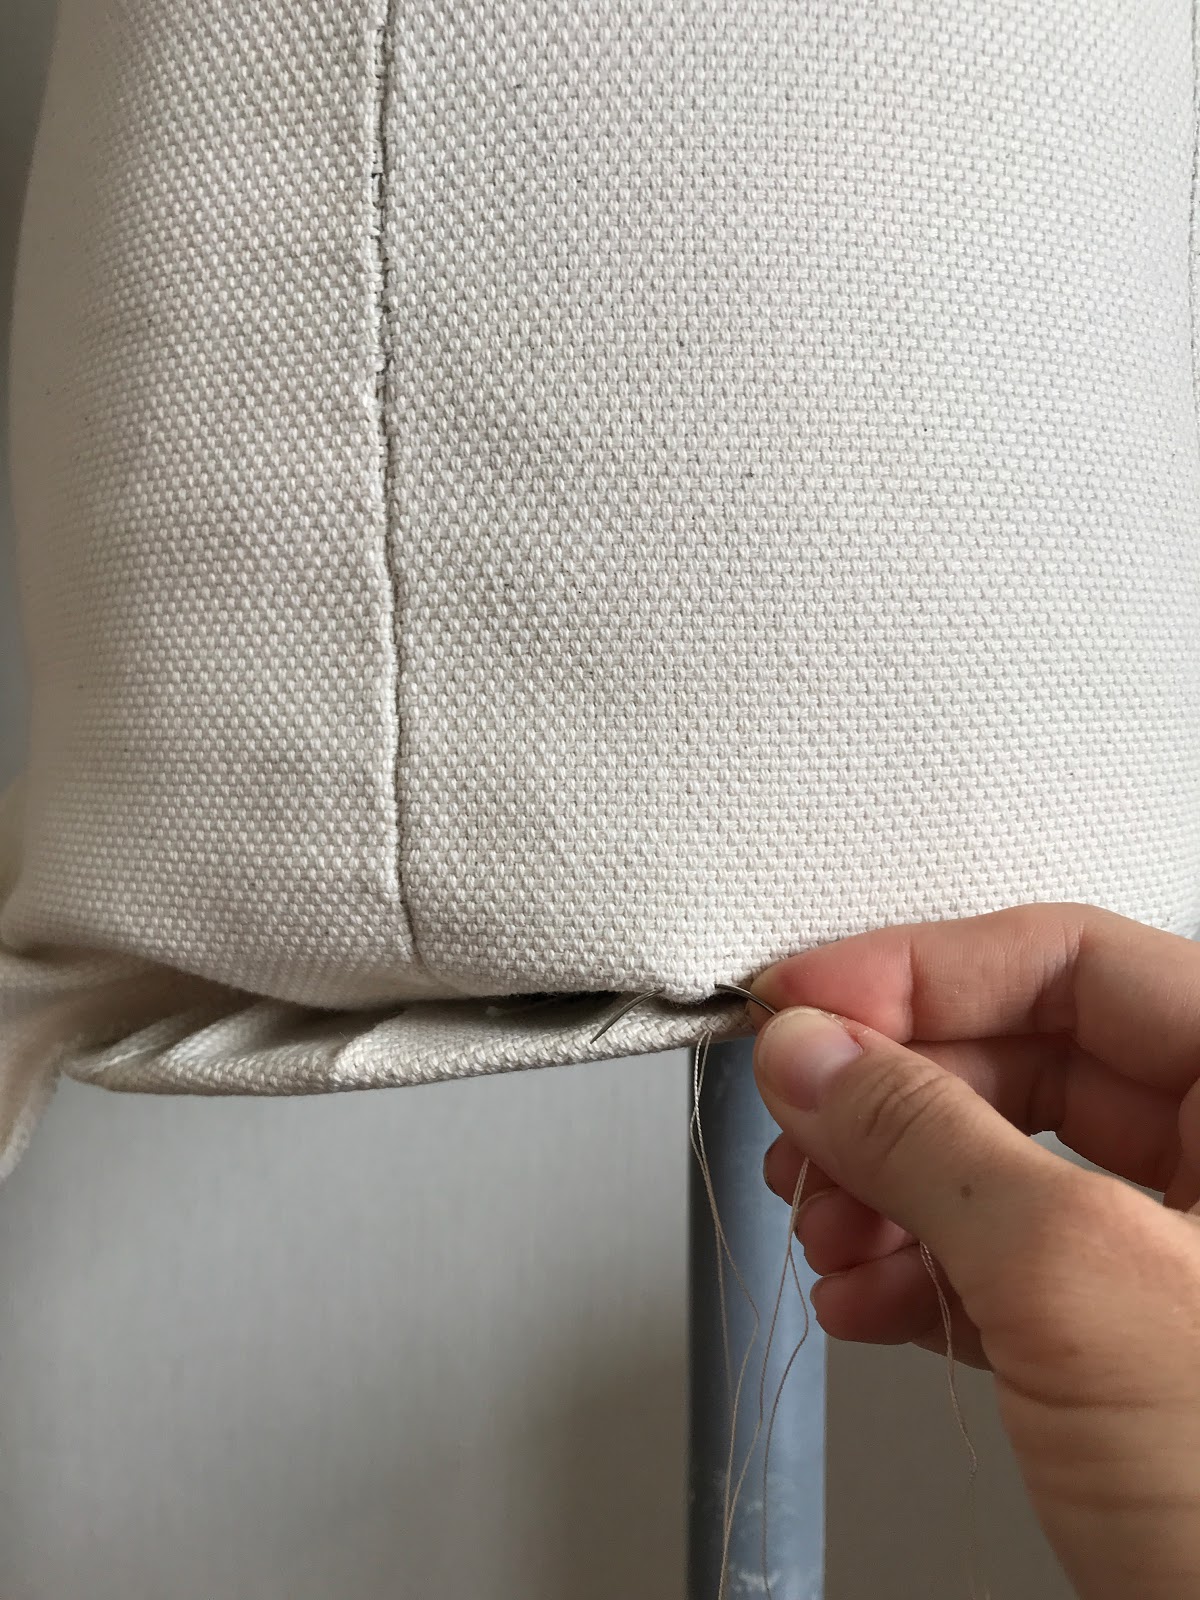 |
| Sewing the cardboard cover on by hand, using a curved quilting needle and silk thread |
Final thoughts
Pros: the project met my goals. It was inexpensive, the supplies were easy to find at my local hardware store, I was able to complete it at home, and the finished product is sturdy, professional-looking, fits my body type, and I can use pins on it.Cons: It was definitely messy. The spray foam squirted unexpectedly a few times, and even after a few washes it's still stuck to my old pants. Sanding and cutting the foam makes dust that gets everywhere, and it's staticky so it can be hard to remove. It also does take quite a bit of effort and time.
So, what do you think? Did I skip any steps? Did I leave you with questions?
If you make this project, I hope you'll share the results here in the comments. Good luck!
Psst, here's the best part: it only weighs 2.5 kg!
 |
| So lightweight at 2.5 kg! |